
How to Make an AI Rap Video from Photos
Make a personal rap video from two portraits or a shared photo. Follow the actual studio controls, check the credit quote and review the finished clip.
Start with the two people who will appear in the video and one thing you want the rap to be about. AI RAP VIDEO accepts two separate portraits or one photo of both people, then lets you choose an available scene preset, video settings and a topic. This guide covers the two-person Rap video mode.
You do not need to record yourself rapping. The studio does not accept an existing song, though: if you need a particular recording to play unchanged, this is not the right input method.
1. Add the two people
Open the studio and keep Rap video selected. Choose Two photos for individual portraits, or One photo of both for a shared picture. With separate portraits, put one person in each upload box.
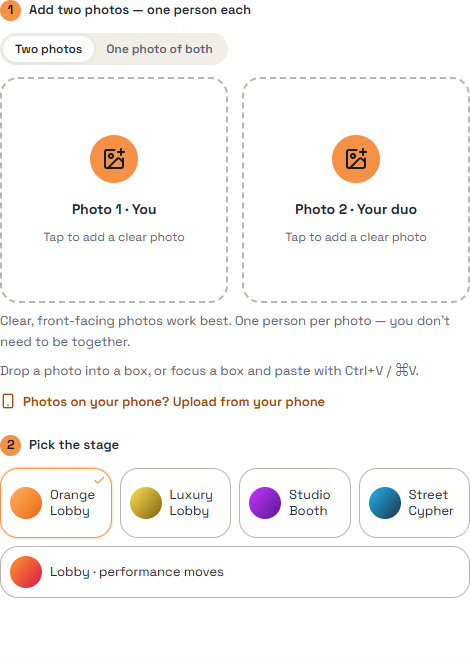
Actual studio interface. Stage choices can change as new options become available.
Check the previews after uploading. Can you see each person's eyes and mouth? Is either face blurred or hidden behind someone else? If so, choose another original before spending credits. The photo guide shows what to look for.
If the images are on your phone, use Upload from your phone and scan the QR code. Keep the desktop upload window open while adding them. This requires a working transfer link that your phone can reach.
2. Pick a stage and a subject
Choose one of the available scene presets under Pick the stage. This selects a provided style; it does not open a background or scene editor. Then add a short topic in Names and occasion, for example:
Lena and Chris celebrating ten years of friendship. They met at a basketball game and still disagree about the final score. Warm and playful.
The memory gives the video something personal to work with. A full biography is harder to fit into a short clip. Keep the name, occasion and one detail; save the longer message for a chat message or social-media post after downloading the video.
The topic is direction for generation, not a script that will be performed word for word. Leave it empty if you do not need a personal subject and the selected style allows it.
3. Choose the settings before buying credits
Expand Pick quality & length. Choose the model, resolution, duration and aspect ratio offered for your selection. For a vertical clip, choose 9:16 when available.
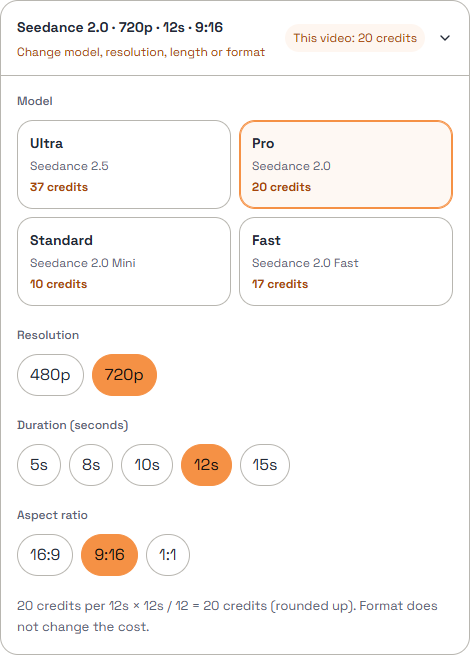
Actual interface captured on October 30, 2026. These are example settings and prices; check your current quote.
Changing the model or video settings can change the credit total. Read This video after making your final selection. When checkout is available, you can buy a one-time credit pack without subscribing; see the credit guide if your balance falls short.
4. Generate, then review the result
Sign in and submit when the photos, topic and quote are ready. Follow the task in the studio or My videos. If it is still processing, wait for its status to change rather than submitting the same request again.
When the clip is ready, play it with sound. If the result includes a vocal, check whether it follows your topic and whether the names are understandable. Watch both faces through the whole video. Entering a topic is not a guarantee that a particular line or detail will appear. A good opening frame is not enough to judge the rest of the clip.
Download the version you want to keep. Once the video has finished processing and saving, a phone-download option can appear beneath the successful result in the studio. Open that option on desktop and scan its QR code to reach the download on your phone. Sharing to a social platform is a separate step.